TB.One > Setup, Configuration & User Accounts > Basic Settings for Order Processing > Setting Default Order Details
Setting Default Order Details
The default order details which are applied during order processing can be defined at "Admin > System settings > Order processing".
1. INVOICE PRINTING AND VAT CALCULATION
In the section "Pre-activate the checkbox "Create invoice" at manual dispatch advices", select all sales channels for which you want to print invoices. The box "Create invoice" will then be activated in advance when employees manually create dispatch advices. This helps maintain a controlled workflow during order processing.
In the section below, titled "VAT calculation for ancillary services", decide whether the highest VAT rate among the ordered items, or the rate that applies to the largest share of the order's total net value should be used.
Example: An invoice contains the following positions: ARTICLE 1: 105 € gross, including 19% VAT (= 88 € net) ARTICLE 2: 102 € gross with 7% VAT (= 95 € net) With the setting "Highest VAT rate (acc. to accounted items)" the ancillary services are calculated with 19% VAT, since it is the highest tax rate on that invoice. With the setting "VAT rate acc. mostly accounted items" the ancillary services will be charged with 7%, because 95 € are > 88 € and constitute the largest net sum on this invoice. |
|---|
2. ITEM REPORTS
In the section "Item reports (in order details)" you can define the default settings for manual order processing via the order list.
Determine if and how ship/return codes should be pre-entered and whether they should be validated for standard parcels. Indicate if the return codes can be assigned manually and for how long after the initial shipment it should be possible to process a return without triggering a warning message. Define if shipping costs should be included in refunds by default, and how to handle the billing of order services at full returns/cancellations.
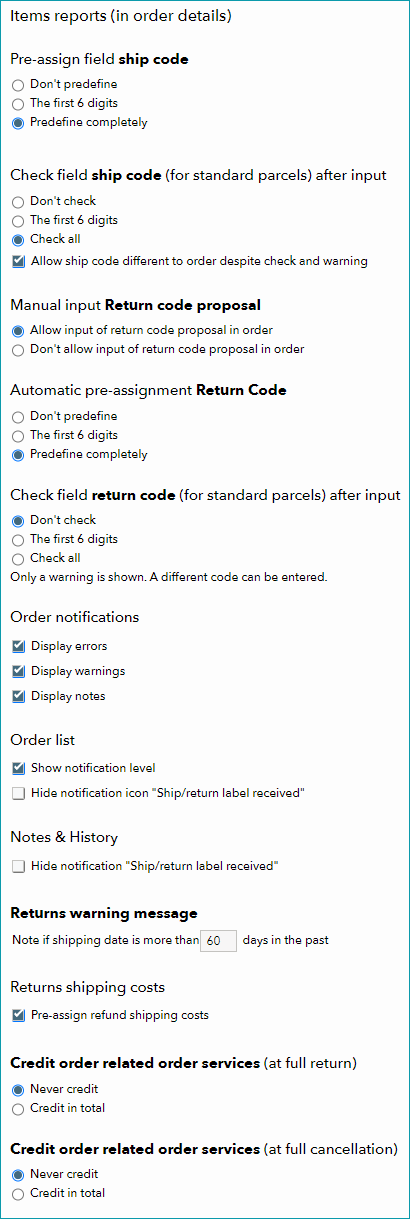
Select the presets that best match your order processing.
TIP: By default, order-related notifications are grouped into three priority levels. In descending order: error, warning, and note. In the order list, the following icons show a notification's priority level:
▪Use the checkbox "Show notification level" to turn the prioritisation of order-related notifications on or off. ▪Use the checkboxes in the section "Order notifications" to configure whether TB.One notifies users about notifications of the respective priority level by displaying icons in the error list. ▪Messages regarding the successful creation of DHL labels are an exception. They have the priority level "note" and may occur very often (depending on TB.One's configuration). You can hide these messages to unclutter the notification menus. Use the checkbox "Hide notification icon Ship/return label received" in the section "Order list" to remove the label notification icons from the order list. To hide the messages entirely, additionally mark the checkbox of the same name in the section "Notes & History". |
3. GOODS ISSUE
The settings for the pre-assignment and validation of shipcodes in the section "Menu item Goods issue" affect the menu "Orders > Goods issue" (described here). The sole purpose of this menu is the creation of dispatch advices. Define, whether the ship codes should be predefined by default and if they should be validated for standard parcels.
4. STATISTICS - EXPORT: PRINTER ICON, E-MAIL NOTIFICATION
In the section "Statistics - export", you regulate whether an export via "TB.One > Statistics > Orders" should include billing addresses.
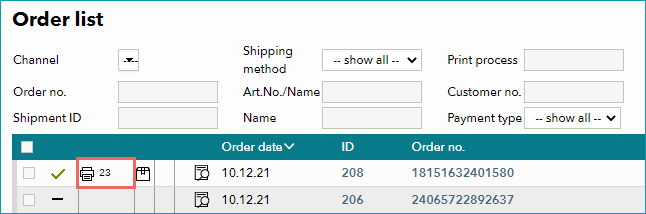
Under "Printer icon in task list prints", define whether order data sheets or delivery notes should be printed when clicking the printer icon in the order list.
Enter if/how often you would like to be notified of the reception of (pending) orders by e-mail at "E-mail notification at new orders". If you want to be notified, enter the destination e-mail address(es) at "Admin > User > Mailing lists".
5. ANONYMISATION OF PERSONAL DATA
According to the new EU-regulation GDPR, personal data must not be saved longer than absolutely necessary. To facilitate the deletion of personal data, you can use the feature in the section "Anonymisation of personal data" at the bottom of the menu "Admin > System settings > Order processing". Here, you can configure channel specific deletion times.
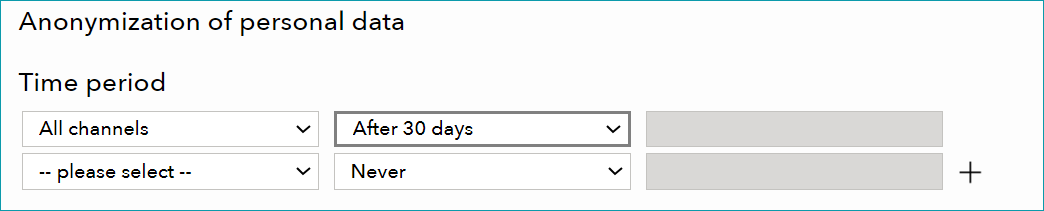
The left drop-down in the first row only contains the value "All channels". In this row, you can select a global deletion time from the drop-down menu in the middle column. This time period is valid for all channels that have not been assigned an individual deletion time.
Use the rows below, if you would like to configure an individual time period for one or more channels. If you select "Customized" in the middle column, the free text field in the right column will be activated. Here, you can specify a custom period either in months (m) or years (y), e.g. "8m".
With the buttons on the right (![]() /
/![]() ), you can add or delete rows.
), you can add or delete rows.
Via the drop-down menu, you can select Use the drop-down menu to select a time-period after which personal data from completed orders should be anonymized. Click "Save" once you have completed your settings.
ATTENTION: |