TB.One > Order Data and Order Processing > Order Processing in TB.One > Order Detail View > Returns
Returns
To record a return, go to "Orders > Order list" and open the corresponding order. In the order detail view, go to the tab "Returns". This tab lists all of the order's items for which dispatch advices were issued to the channel.
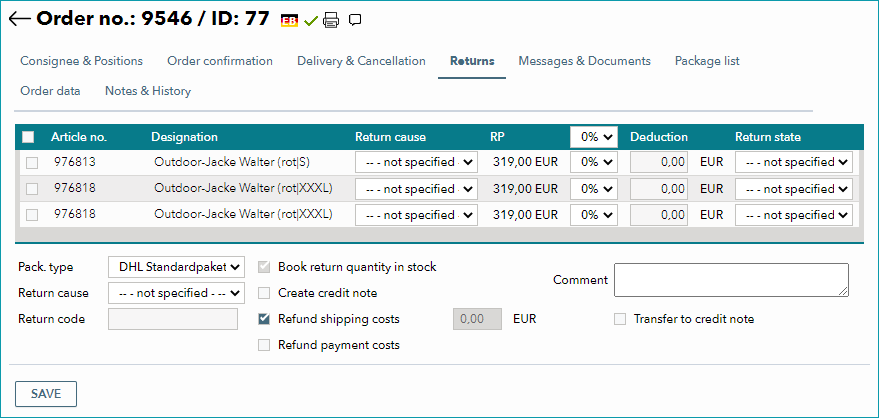
Mark the checkbox in the left column for each returned item. To manage your returns more effectively, you can indicate "return causes" and "return states" (condition of the returned articles) in the respective columns. If you only want to reimburse part of the retail price, use the drop-down menu located between the columns "RP" and "Deduction" to enter the percentage of the retail price that should be deducted from the reimbursed amount. The field labeled "Deduction" will then show the deducted amount.
Example: If you select 10% as the deducted amount, 90% of the retail price will be reimbursed.
ATTENTION: |
In the menu's bottom section, you can change the package type and return code. Check the box "Book return quantity in stock" if the number of articles returned should be added to your stock (provided this is not your default setting anyway). Indicate whether shipping and/or payment costs should be refunded (it is possible to refund shipping costs partially or in full). In the field "Comment" you can add your own text. If you would like this text to appear on the credit note, check the box "Transfer to credit note". With the drop-down "Return cause", you can set a global return cause for the order. This will not overwrite any of the individual return causes set in the respective column (see above).
If all items were returned you can check the box in the header row to activate them simultaneously.
Clicking "Save" will confirm the return. The returned items will no longer be listed. Instead, the returns message can be viewed on the tab "Messages & Documents".
ATTENTION: |
TIP: 1. Activate items by marking the checkboxes |
For further information, see also:
•Manual order processing - overview
•Booking returns via Scan-Desktop