TB.One > Product and Article Data > Data Quality & Error Management > SolutionCenter > SolutionCenter - Error List
SolutionCenter - Error List
ATTENTION: The article error hub replaces the SolutionCenter |
A click on "Error List" in the SolutionCenter's main navigation will open this menu. Initially, all of the TB.One account's error messages are listed here.
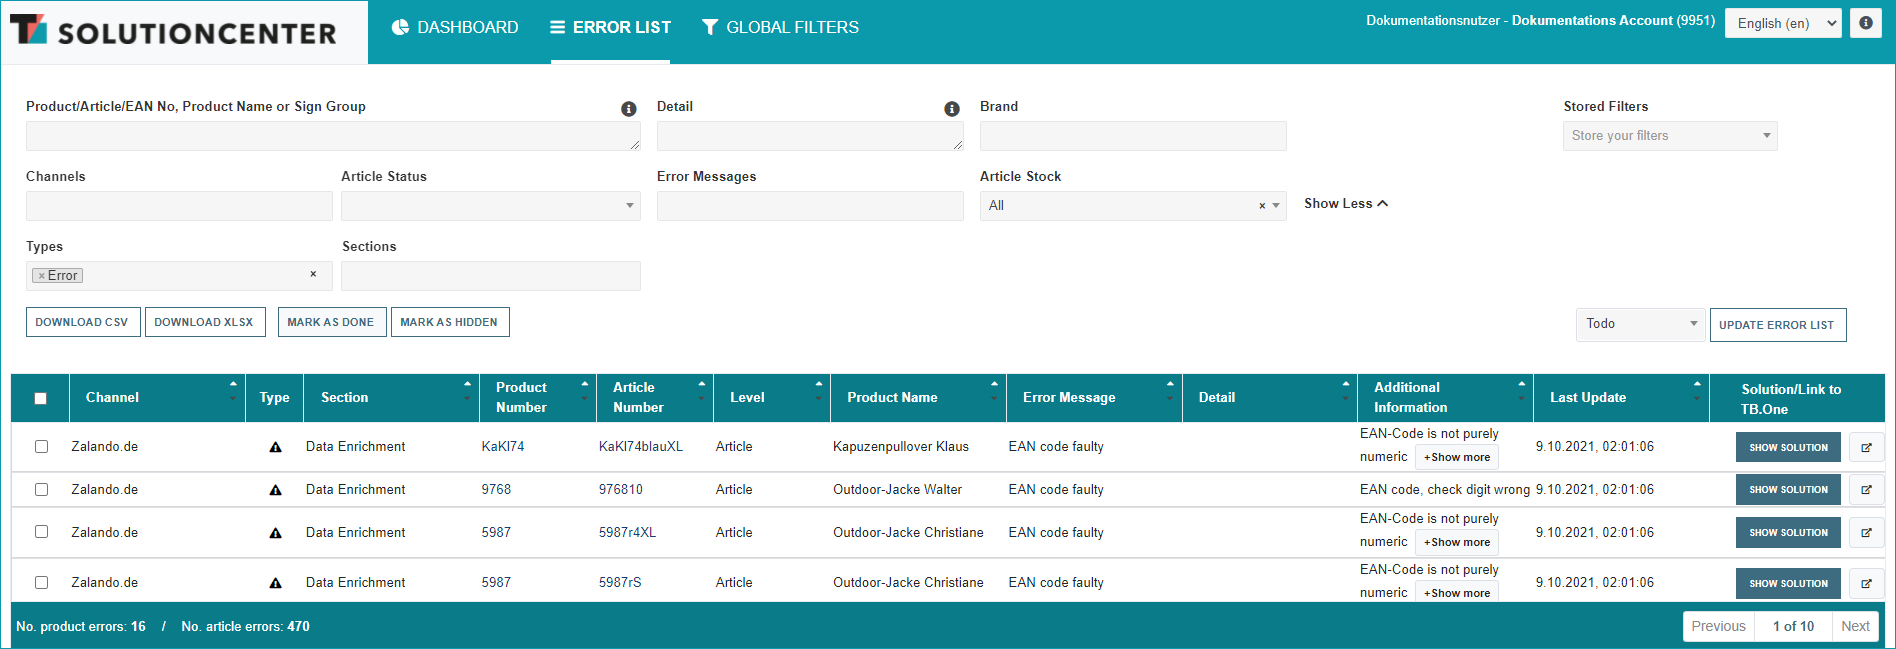
The upper part of the menu contains a filter section, which you can use to configure the list. To keep a better overview of the filter section, the filters “Types” and “Sections” can be hidden/shown via the button “Show Less”/“Show More”.
You can search for specific products or articles via name or product/article/EAN number. To do so, enter the search text into the respective field and confirm by pressing the "enter" key. Additionally, you can filter for specific channels, error sections or error messages. You can also filter the error list by the stock information stored for the affected articles. To do so, select one of the three listed options from the “Article Stock” filter’s drop-down.
If you remove the term "Error" from the field "Types", the filter will be reset and warnings and hints will be displayed on the list as well. You can also filter the error list by the stock information stored for the affected articles. To do so, select one of the three listed options from the “Article Stock” filter’s drop-down
If you want to save a filter, click on the menu "Stored Filters" in the upper right corner, enter a name for the filter and press the "Enter" key to store it.
You can then use the buttons next to the drop-down "Stored filters" to select the current filter as the (user-specific) default or to delete it.
BUTTON |
MEANING |
|
|---|---|---|
|
Choose the selected stored filter as the user account's default filter. The filter will be applied automatically when the user opens the error list. To undo the selection, click the button again. |
|
|
Delete the selected stored filter.
|
Clicking one of the "Download" buttons below the filters downloads the filtered list as a CSV or XLSX file. The buttons "Mark as done" and "Mark as hidden" change the processing status of an error (see below under "2. Processing status"). Use the drop-down on the right to switch between errors marked as "Todo", "Done", or "Hidden".
If the error list is several pages long, you can switch between pages or jump to the next or last page via the navigation on the bottom right.
The error list contains the following fields: Channel, Type, Section, Product Number, Article Number, Level, Product Name, Error Message, Detail, Additional Information, Last update, Realtime data active.
THE FOLLOWING MESSAGE TYPES ARE DISPLAYED IN THE LIST: |
|
|---|---|
|
The affected product/article is not exported to the channel. |
|
The affected product/article is exported to the channel, but some specifications may differ from your configurations. |
|
The affected product/article is exported to the channel, but some details could be improved. |
THE FOLLOWING ACTION LINKS MAY BE DISPLAYED IN THE RIGHT COLUMN: |
|
|---|---|
|
A click on the "Show solution" button will lead to the solution page for the respective error (see "1. Solutions" below). |
|
This is the "Link" button. A click on the button will lead directly to the respective detail page in TB.One. |
1. SOLUTIONS
To clear the error messages, the corresponding errors have to be solved. A click on the "Show solution" button at the end of a row in the error list will lead you directly to the solution page. Here, all existing errors for the respective channel are displayed and can be selected. The solution strategy for the selected error is displayed in the center of the page. On the right, you will find a step-by-step guide for solving the error via the TB.One UI or via CSV (if possible). If both solutions are available, you can switch between the guides by opening the respective tab. If the solution via CSV is possible, you can download an editable CSV file by clicking the button "Download CSV" below the step-by-step guide. Clicking on the button "Mark as done" will mark the error as resolved.
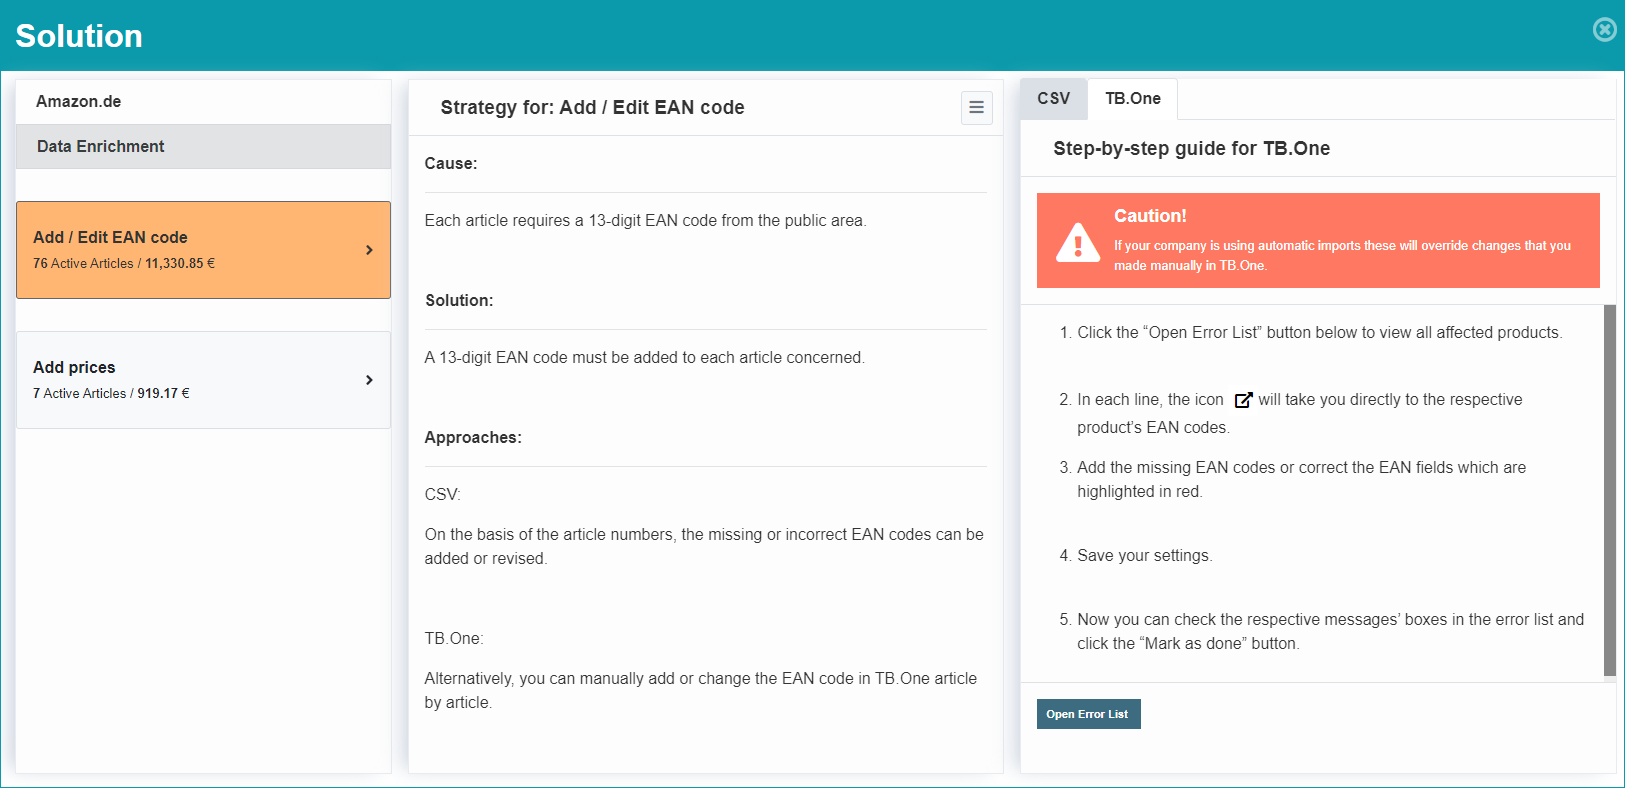
To solve the problem through TB.One's UI, click on the link button in the error list. This will lead you directly to the menu in which you can resolve the error.
2. PROCESSING STATUS
If you have marked one or multiple errors with checkmarks (first column) and click on the button "Mark as done" above the error list, the corresponding error messages will be marked as done and moved to the list "Done".
Similarly, you may mark errors as "hidden", to move them to a list of hidden errors.
ATTENTION: Errors moved to the list "hidden" will remain on that list, until they are moved to "Todo" manually. |
The three lists can be accessed via the drop-down menu on the top right. Here, you can switch between lists that contain all errors marked as "Todo", "Done", or "Hidden".
3. CHANNEL-SPECIFIC UPDATES OF THE ERROR LIST
TB.One updates the error list automatically with each export to a channel. And with an update of the error list, all errors you have resolved successfully are removed.
Check the column "Last update" to see when an error was last updated.
Additionally, you can update the error list manually up to 5 times per day - depending on each channel:
▪Click on the button "Update error list".
▪A pop-up menu will prompt you to select the channel for which you want to update the error list.
▪Click on the button "Update" to update the error list for the selected channel.
TIP: |
4. FULL ERROR REPORTS
The full error report feature is available to you upon request. Once it has been activated, you will find the new button "Download Full Report" to the right below the filters. It enables you to create full error reports at the click of a button. Filter for a channel and click the button “Download Full Report”. This CSV report is generated every morning. It contains a complete overview of all errors recorded in the SolutionCenter related to the selected channel. If you would like to activate this feature, please contact your Success Manager.
For further information, see also:
•SolutionCenter - overview
•Proof of data quality - overview