TB.One > Product and Article Data > Templates > Creating and Assigning Title Profiles
Creating and Assigning Title Profiles
CREATING A TITLE PROFILE
Product titles can be configured at "Basic data > Templates > Title profiles". To create a new title profile, select the tab "Pages" in the left navigation bar and click on "Create new title profile". In the editing window, you can then select which elements should be combined to form the product title. Each element may be used as often as you like and you are free to choose the order.

If the box "Required" is checked, the corresponding field will be prioritized. This will have an effect if the length of the title exceeds the maximum number of characters permitted by a channel. In that case, elements will be removed from the title from back to front. First, the elements which are not prioritized will be removed. If that is not sufficient, the "Required" elements will be removed as well (word for word until the title falls within the limits of the channel's maximum character length). The following elements may be chosen:
ELEMENT |
DESCRIPTION |
|---|---|
Adds the brand name to the product title. |
|
Adds the common noun of the product. |
|
Adds the proper name of the product. |
|
If you maintained your product designations in a single field (instead of common noun/proper name), select this option |
|
The category to which the product belongs („Basic data > Classification > Typification“) is displayed in the title. |
|
If you choose "Component", an additional drop-down menu opens in the middle, where you can select a component to add its value to the title. This element only adds the component's value, not its name. If a product has been assigned the component "colour" with the value "blue", the element "Component" will add the word "blue" to the title, not the word "colour". If you select a variant forming component with multiple values, they will all be listed (separated by commas). |
|
If you choose "Attributes", an additional drop-down menu opens in the middle, where you can select an attribute to add its value(s) to the title (separated by commas). This element only adds the attribute's value(s), not its name. If a product has been assigned the attribute "season" with the values "Spring" and "Summer", the element "Attributes" will add the text "Spring, Summer" to the title, not the word "season". |
|
Component name |
If you choose "Component name", an additional drop-down menu opens in the middle, where you can select a component to add its name to the title. This element only adds the component's name, not its value. If a product has been assigned the component "colour" with the value "blue", the element "Component name" will add the word "colour" to the title, not the word "blue". |
Attribute name |
If you choose "Attribute name", an additional drop-down menu opens in the middle, where you can select an attribute. This element only adds the attribute's name, not its values. If a product has been assigned the attribute "season" with the values "Spring" and "Summer", the element "Attribute name" will add the word "season" to the title, not the text "Spring, Summer". |
Split variants |
A product with variants can be split up into multiple products if a channel does not permit variant dimensions in that product's category. If "Split variants" is chosen, the values which are no longer used as variants will be added to the title in brackets. In the middle column, you can choose a character to separate multiple variant values (e.g. size and color). Make sure to comply with the channel's requirements regarding the separator (some channels do not allow certain characters in the title). The preview option below displays product titles. Variant properties, however, are added to the article. Therefore, the setting has no effect on the preview. |
Variant properties |
Adds the variant properties of the article to the title (e.g. "T-shirt Streetstyle blue XL"; "blue" and "XL" are the variant properties). In the middle column you can choose a character to separate multiple values with. Make sure to comply with the channel's requirements regarding the separator (some channels do not allow certain characters in the title). The preview option below displays product titles. Variant properties, however, are added to the article. Therefore, the setting has no effect on the preview. Currently, this option is only usable for Amazon. |
Variant value |
Adds the value of a single variant-forming property (e.g. the colour) to the title. |
Free text |
Here you may enter any text that should be added to the product title. |
Price (from) |
The lowest price among the product's articles will be determined and added to the title. |
It is a legal requirement to display base prices in immediate vicinity of the retail price. Since some channels do not calculate the base prices themselves or display them in the wrong place you may want to add them to the title. |
|
Adds the product number to the title. |
|
Adds the special text to the title. |
|
Adds the article number to the title. Multiple numbers are separated by commas. |
|
Adds the article number 2 to the title. Multiple numbers are separated by commas. |
|
Adds the manufacturer article number to the title. Multiple numbers are separated by commas. |
|
Adds the EAN to the title. Multiple numbers are separated by commas. |
|
Adds a tag from the Twig Templating Language. The available tags are listed in the TTL documentation. |
The field "Filter" (third column) can be used to change the formatting of an element (e.g. uppercase, lowercase, first letter of a word capitalized).
You can check the impact of your settings in the section "Title profile preview". By choosing a channel, you activate that channel's requirements regarding titles (e.g. length). The product you choose for the preview must be valid and active on the selected channel.
ASSIGNING A TITLE PROFILE
To use the created title profile, open the settings of the respective channel ("Channels > [Channel] > Settings") and go to the tab "Product texts". Here, you can enable the use of configurable titles and then select an assignment base and a default title profile. The default value will be automatically applied for each element that is part of the assignment base and can then be overwritten.
When you have selected an assignment base, the possible values this assignment base may take are listed below. Via drop-down menus, you can assign them individual title profiles. The title profiles are used for your products according to this assignment base. Note that changing the default value will override all configurations in the assignment fields below.
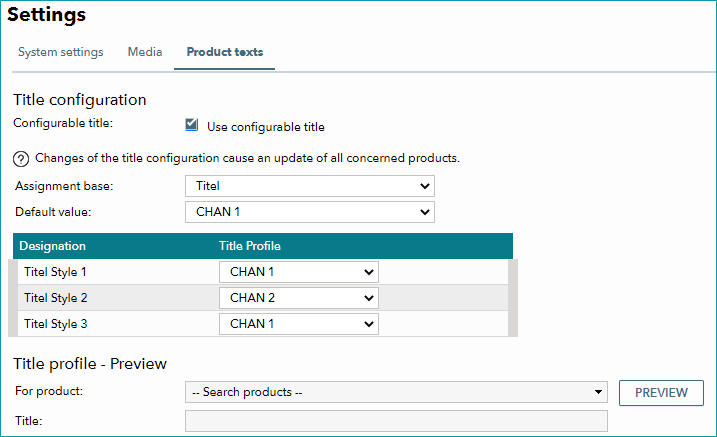
TIP: In the screenshot above, the flag "Titel" was selected as the assignment base. It has the three values "Titel Style 1", "Titel Style 2", and "Titel Style 3". For products that were assigned the flag "Titel Style 2", the title profile "CHAN 2" is used. All other products use the default profile "CHAN 1". |
In the section below you can view a title preview based on a product. The preview will use the title profile that was selected for the assignment base.
Save your settings when you have assigned your title profiles.