TB.One > Setup, Configuration & User Accounts > Getting Started > Setting up Printers (TB.Print)
Setting up Printers (TB.Print)
TB.Print is a desktop application you can install locally and which you can use to control label printers and PCL6-ready laser printers connected to the local network. The printers are needed during the order processing to produce shipping labels (DHL Germany only) and shipping documents such as delivery notes and invoices.
The output of documents via TB.Print must be activated at "Admin > System settings > Documents" in the section "Automatic output of PDF documents". By default, normal document printing (documents are "printed" as PDFs), which does not require TB.Print, is activated in TB.One.
INSTALLATION
In order to install TB.Print, open the menu "Admin > System settings > Printer" in TB.One and choose the install file that fits your operating system (system requirements: 64-bit version, Windows or Linux Ubuntu) by clicking the corresponding download button. When the download is complete, start the installation.
CONFIGURATION
Once the installation is complete, the application will automatically start. The Tradebyte icon will appear in your taskbar. RIght-clicking on it will bring up a menu which contains the items "Printers" and "Status".
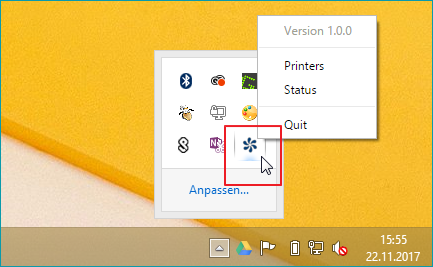
MENU ITEM "PRINTERS"
Open the menu item "Printers". Here you can set up the various label- and document printers and add further printers if required.
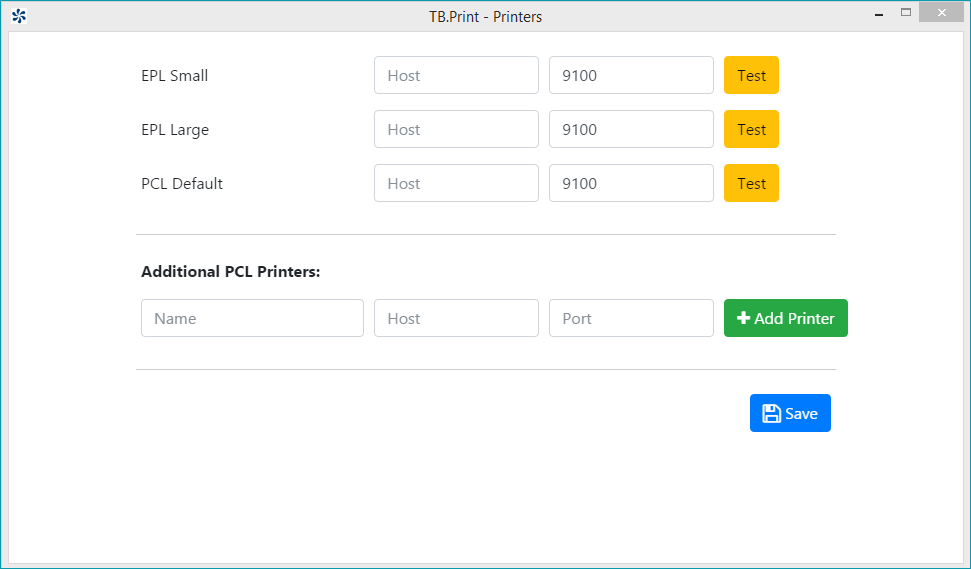
The left column in the upper section shows three printer types:
FIELD |
MEANING |
|---|---|
EPL Small |
Printer for article labels |
EPL Large |
Printer for DHL shipping labels |
PCL Default |
Printer for DIN A4 sheets (delivery note, invoice, etc.) |
To the right of each printer type are two columns with text boxes, and a button titled "Test":
FIELD |
MEANING |
|---|---|
Host |
Enter the printer's IP address (ask you administrator or check your computer's system settings) |
Port |
Enter the printer's port number (default: 9100; other values possible) |
Test |
Will print a test page |
Fill in "Host" and "Port" for each printer.
In the bottom section you can add further DIN A4 printers by clicking on the "Add Printer" button. Fill in the text boxes "Host" and "Port" as described above, and specify a name for the printer. Don't forget to save your settings. When you have completed these steps, contact your Tradebyte Account Manager, who will then activate the added printers in your TB.One account.
MENU ITEM "STATUS"
Here you can find a list of all print jobs that are in progress or have failed (max. 100):
FIELD |
MEANING |
|---|---|
Time |
Time of print job |
Printer |
Selected printer for the job |
Status |
"In progress" or "Failed" |
With the button to the right of the status column print jobs can be repeated. Successful print jobs are removed from the list.