TB.One > Order Data and Order Processing > Order Processing in TB.One > Order Processing via the Scan Desktop
Order Processing via the Scan Desktop
The purpose of the scan desktop is to simplify the processing of orders for warehouse employees. With the scan desktop, they do not need to navigate any other menus in TB.One that are irrelevant to them.
TIP: It is possible to navigate the Scan-Desktop by scanning barcodes. To print these "navigational barcodes", go to the Scan-Desktop ("Orders > Scan Desktop"), open the left sidebar on the tab "Pages" and click on "Barcode output as PDF". |
1. STRUCTURE OF THE SCAN DESKTOP
The scan desktop can be found at "Orders > Scan desktop" in TB.One. The menu consists of two tabs "Dispatch advices" and "Returns". The dispatch advices can also be used to issue cancellations.
2. DISPATCH ADVICES AND CANCELLATIONS
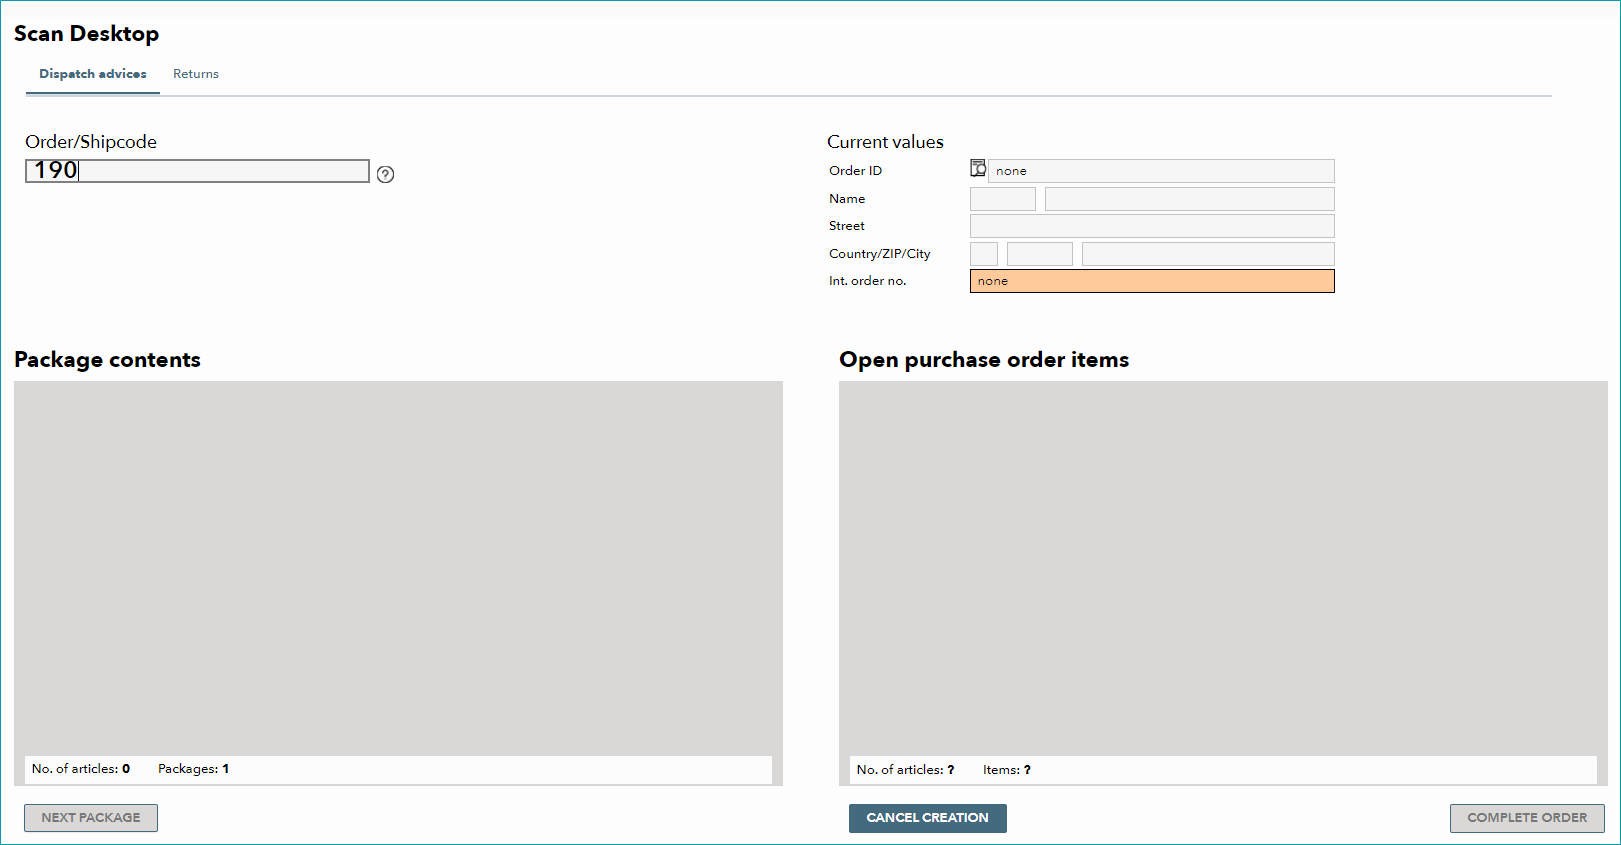
When you open the scan desktop, the cursor is already in the box "Order/Shipcode" in the tab "Dispatch advice". You can enter the order directly by scanning the order/shipcode label. Alternatively, enter the order ID or the shipcode manually and press the "enter" key to display the individual order items.
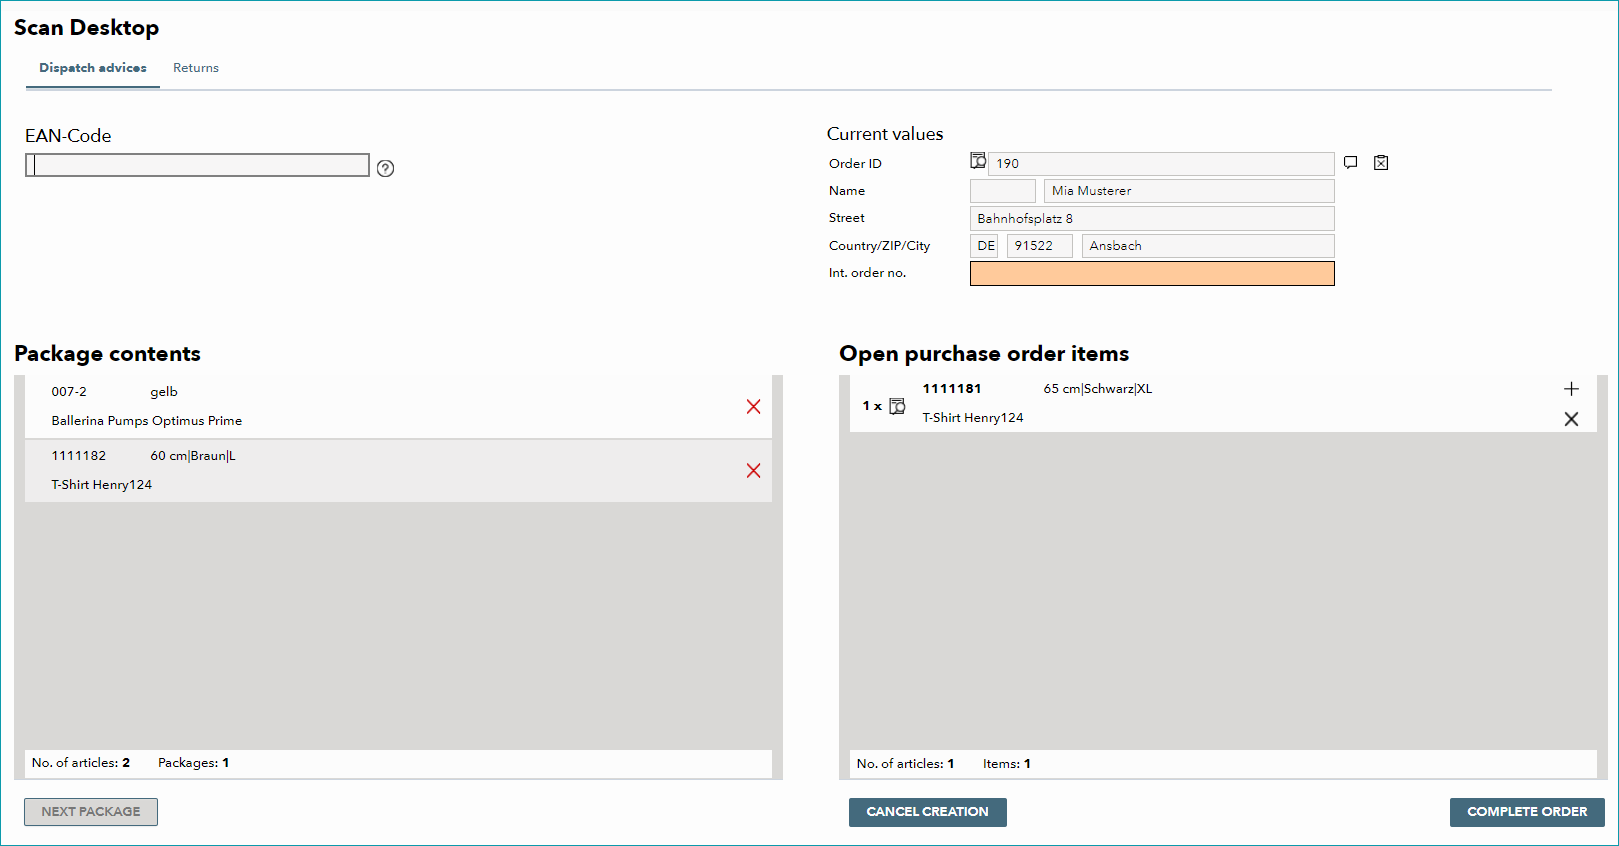
In the section "Current values", you will then see the order's shipping address and the order ID. The order detail icon to the left of the order ID opens a pop-up window, which can be used to write an internal comment or to open the order in the order list.
Existing internal comments can be viewed by hovering over the speech bubble icon ![]() to the right of the order ID. The icon
to the right of the order ID. The icon ![]() indicates, that the shipping address is different from the invoice address. If necessary, enter an internal order number in the respective field.
indicates, that the shipping address is different from the invoice address. If necessary, enter an internal order number in the respective field.
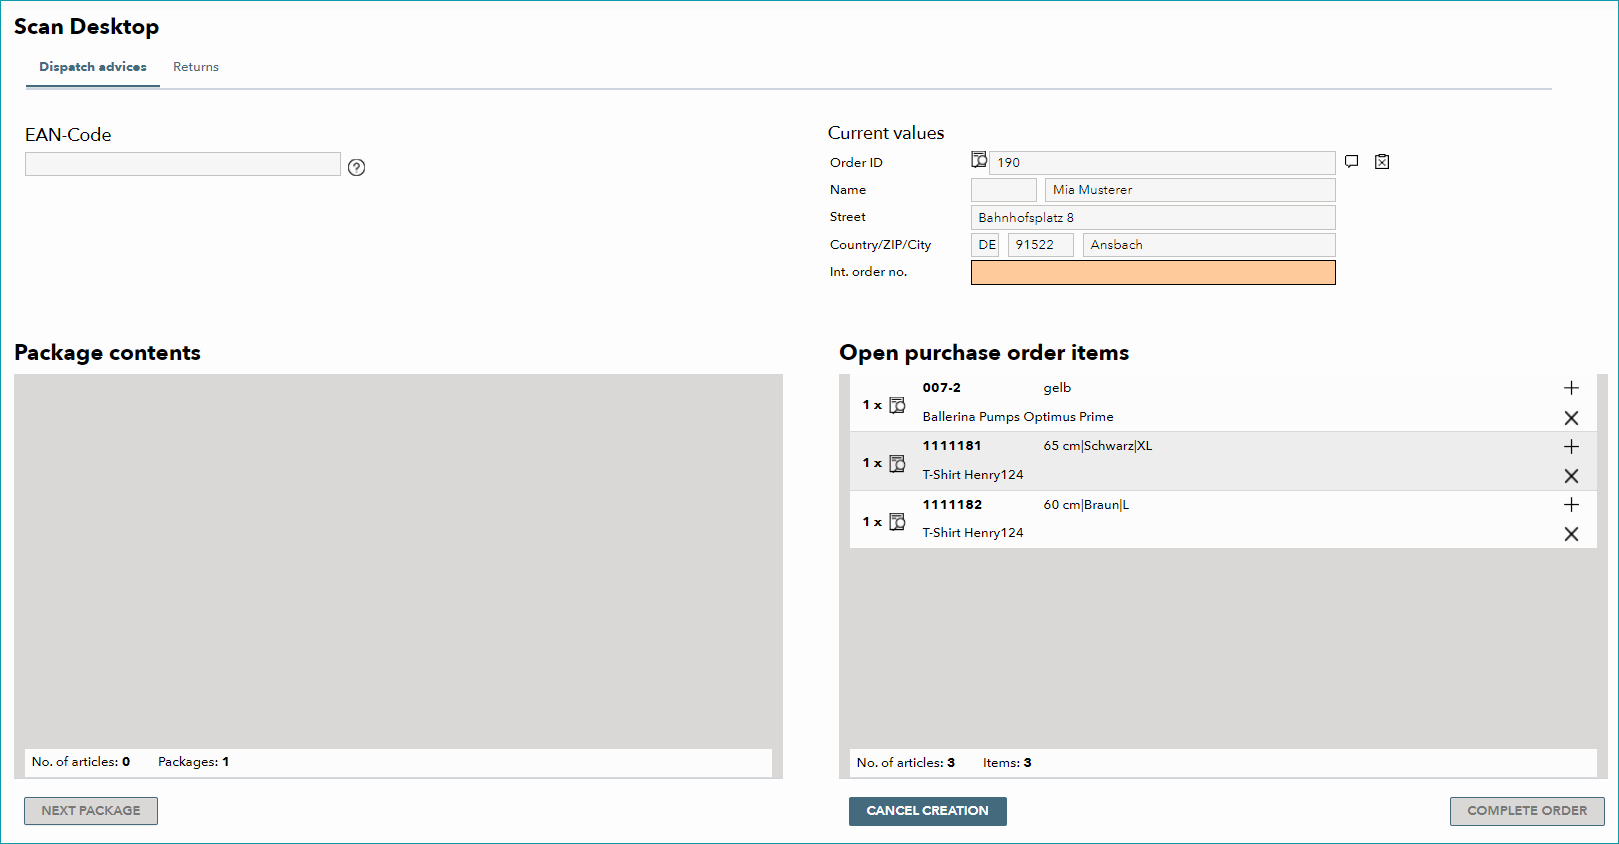
Now, you can trigger dispatch advices by scanning the EAN code for each item. Alternatively, you may create the message by manually clicking the "add" icons (![]() ) next to the order items. Items selected with one of these methods will be moved from the list "Open purchase order items" to "Package contents".
) next to the order items. Items selected with one of these methods will be moved from the list "Open purchase order items" to "Package contents".
In the left window, the "delete" icon (![]() ) can be used to remove an item from the package contents. It will then be displayed as an open item again (section "Open purchase order items").
) can be used to remove an item from the package contents. It will then be displayed as an open item again (section "Open purchase order items").
If you cannot deliver an article, use the icon ![]() to generate a cancellation message. The item will then be removed from the list of open order items, but will not appear in the "Package contents" section. Alternatively, it is possible to configure your settings at "Admin > System settings > Order processing", so that all articles that were not scanned are automatically canceled upon completing the order.
to generate a cancellation message. The item will then be removed from the list of open order items, but will not appear in the "Package contents" section. Alternatively, it is possible to configure your settings at "Admin > System settings > Order processing", so that all articles that were not scanned are automatically canceled upon completing the order.
ATTENTION: |
The button "Next package" can be used for large orders with many positions, that are shipped in multiple packages.
To complete the process, click on the button "Complete order" in the bottom right corner or scan the barcode "Complete the process".
If automatic billing or shipping label creation is activated in your TB.One settings, and TB.Print is running, the invoice will open as a PDF or the label will be issued.
TIP: 1. Scan order Cancellation in brief: 1. Scan order |
3. RETURNS
To create return messages, select the tab "Returns" in the scan desktop. When creating return messages, you should always choose the default option "with order". The option "without order" must only be used for the channel Otto's integration model (the option is only available if it was activated in the settings).
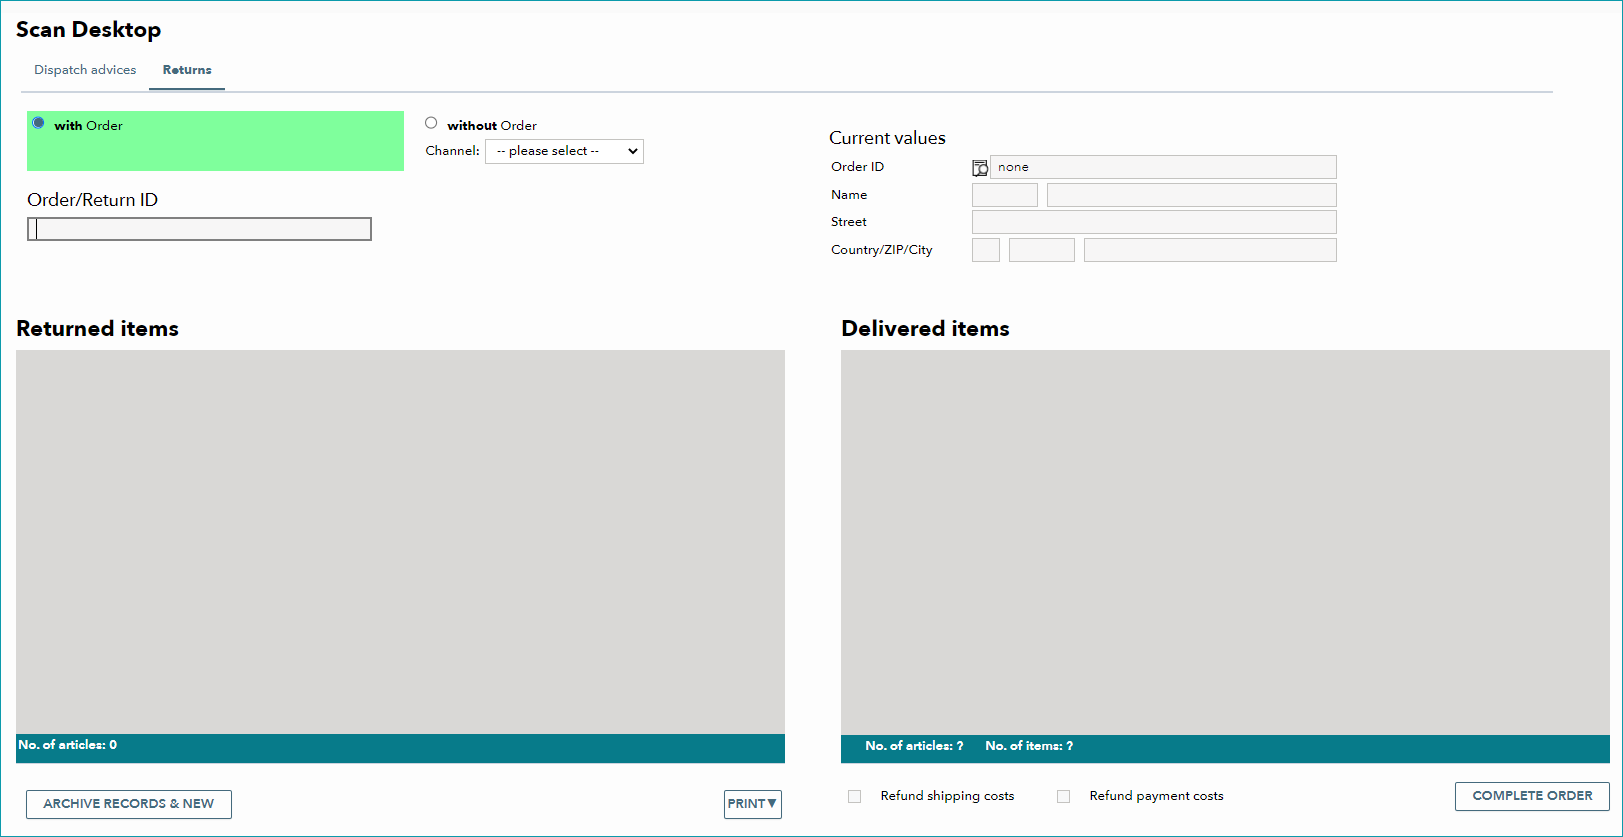
Place the cursor in the field "Order/Return ID" and scan the order or return ID shown on the return form. Alternatively, you can enter this information manually. The items included in your order will be displayed in the window "Delivered items" on the right. Under "Current values", the order ID and shipping address are displayed. Clicking on the icon ![]() will open a pop-up window, where you can enter an internal comment.
will open a pop-up window, where you can enter an internal comment.
A speech bubble icon ![]() to the right of the order ID indicates that an internal comment is available. The icon
to the right of the order ID indicates that an internal comment is available. The icon ![]() means that the shipping address differs from the invoicing address.
means that the shipping address differs from the invoicing address.
Scan the EAN codes of the returned items, or click the add icon (![]() ) next to the respective item in the list. If several identical articles were ordered, the number of articles is displayed in the corresponding item line. In this case, one article will be moved to "Returned items" and the number in the "Delivered items" section will be reduced by one each time the EAN is scanned. If required, activate the boxes "Refund shipping costs" and "Refund payment costs". Items that were moved to "Returned items" by mistake can be returned to the "Delivered items" list by clicking the respective "delete" icon (
) next to the respective item in the list. If several identical articles were ordered, the number of articles is displayed in the corresponding item line. In this case, one article will be moved to "Returned items" and the number in the "Delivered items" section will be reduced by one each time the EAN is scanned. If required, activate the boxes "Refund shipping costs" and "Refund payment costs". Items that were moved to "Returned items" by mistake can be returned to the "Delivered items" list by clicking the respective "delete" icon (![]() ).
).
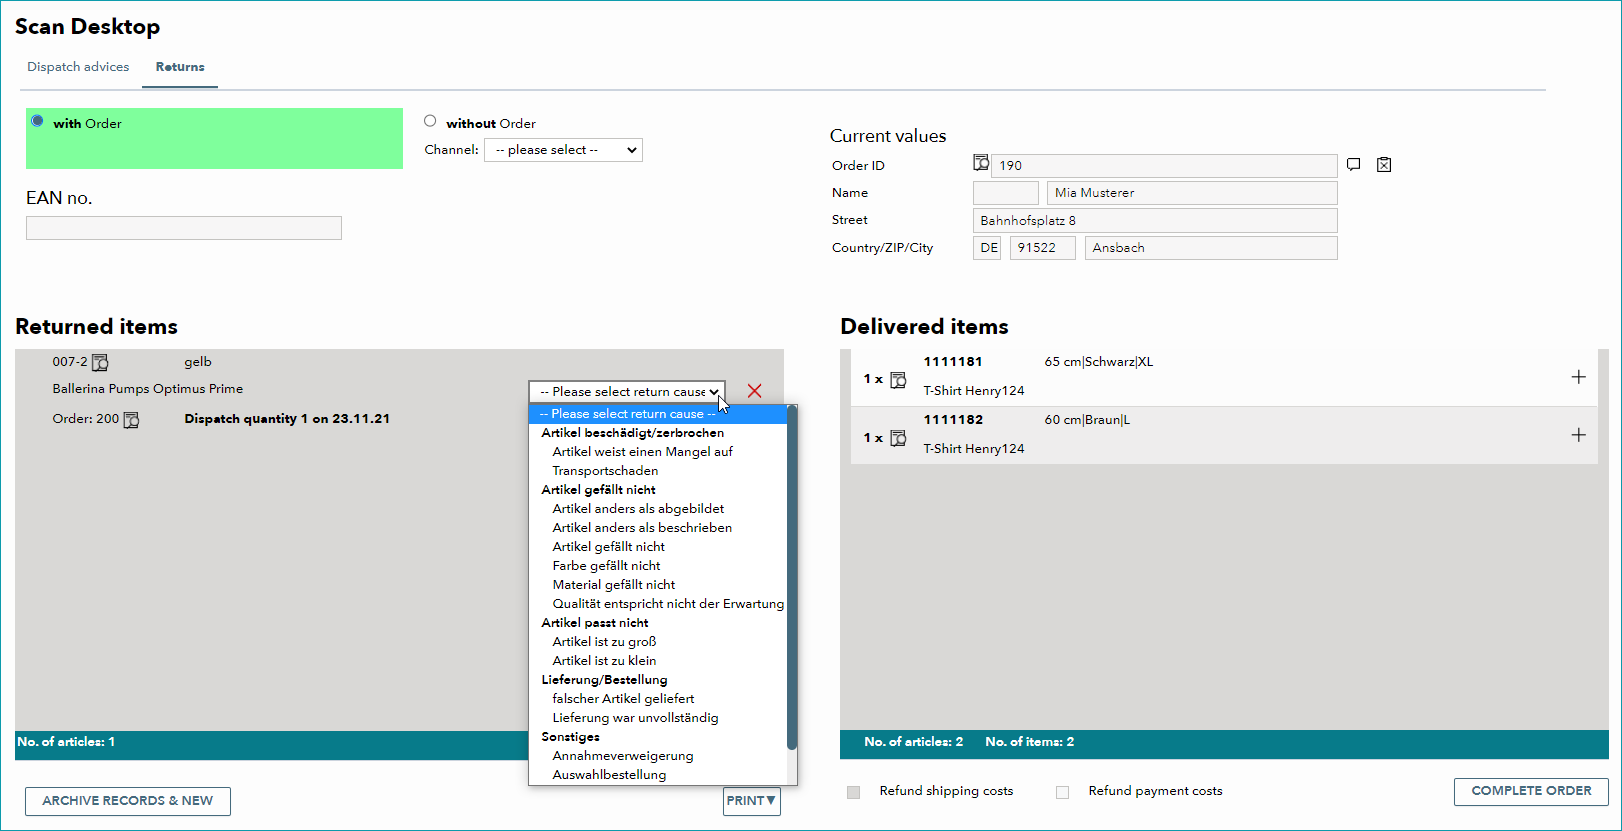
In the "Returned items" list, you can select a return cause for each article. This can either be done by selecting a value form the drop-down list or by scanning the return code for that return cause. Scanned return causes will always be applied to the last item that was moved to the "Returned items" section.
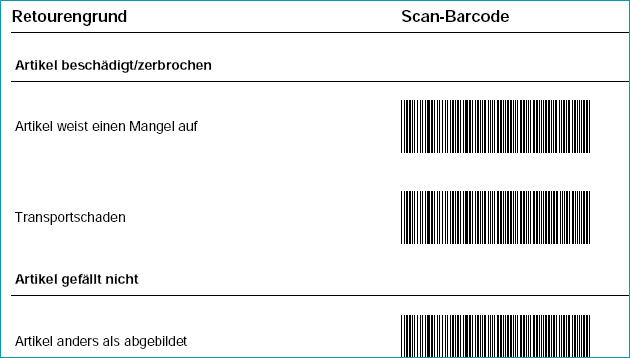
The return codes are automatically created by TB.One and cannot be confused with other barcodes.
Once you have entered all returned items (including return causes), confirm the return by clicking "Complete order", or by scanning the code "Complete process". A credit note will be generated automatically. Additionally, you can click the "Print" button to print product labels or a return list.
TIP: 1. Scan order |
For further information, see also:
•Manual order processing - overview
•Issuing dispatch advices via the standard menus