TB.One > Setup, Configuration & User Accounts > Getting Started > Personalizing TB.One
Personalizing TB.One
In general, there are two ways in which TB.One can be personalized: activating/deactivating fields (for all users) and personal settings, which the users can configure themselves.
1. (DE)ACTIVATING FIELDS
The following settings apply system-wide and will affect all users.
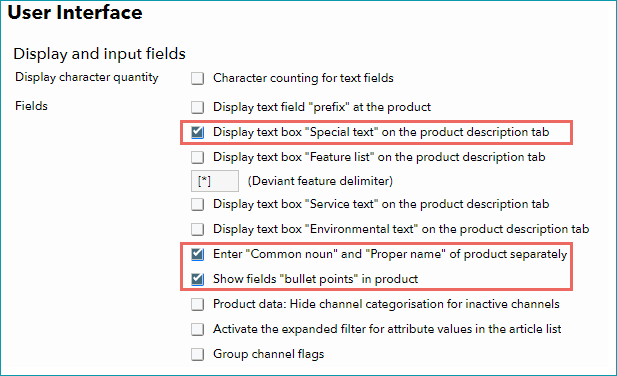
1.1 INPUT FIELDS FOR PRODUCT DATA
At "Admin > System settings > Interface" you can activate fields, which will then be displayed in the product detail view. Upon activation of your TB.One account, only the basic fields will be displayed. However, most channels require you to provide more data, which is why you need to activate the corresponding fields. You should configure the fields immediately and before you enter any product data. These settings affect all users and determine, which product data can be entered manually. Activate the fields for "special text", "bullet points" and splitting the product designation into "Common name" and "Proper noun".
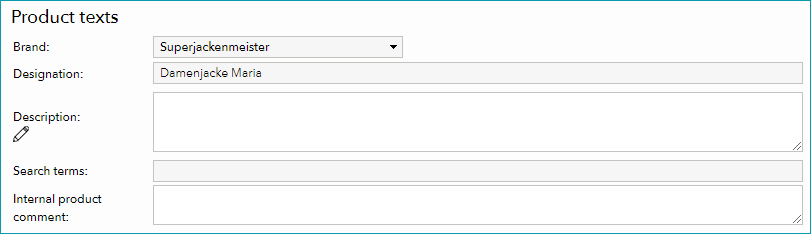
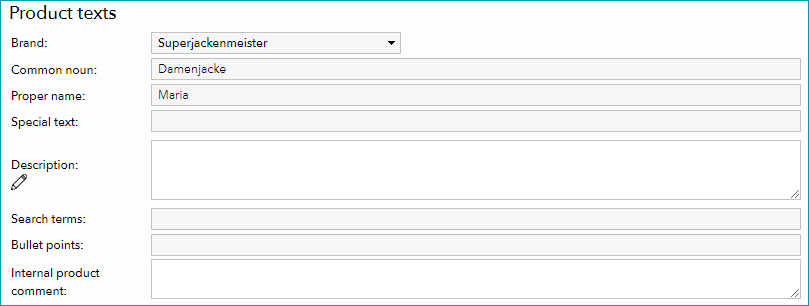
After saving your changes, the product description menu will change as follows:
BEFORE
AFTER
TIP: |
1.2 CHARACTER COUNTER
Above the checkboxes for the fields, you will find a box which can be used to activate or deactivate the character counter for text fields. This feature can be very useful for the manual data entry. It will cause a small box to appear next to each of the product description's fields, which displays the currently entered number of characters (including spaces) and helps you adhere to any restrictions defined by the channel(s).

The counter is displayed whenever the text in the corresponding field is changed.
1.3 GROUP CHANNEL FLAGS
Activating the checkbox "Group channel flags" will allow you to configure the display of channel flags in the section order statistics.
Retrieve the order statistics via "Statistics > Orders" (below the Tradebyte flower). By clicking the magnifying glass, you can open a pop-up window which provides further information on your articles. By default, all the corresponding channel flags are displayed next to each article in the column "Channel activation". Especially, if you have a large number of channels associated with these articles, it can be helpful to simplify the display by grouping the channel flags.

If the checkbox "Group channel flags" via "Admin > System settings > User Interface" is active, TB.One replaces the channel flags - referring to the pop up window mentioned above - with a blue info box. When moving your cursor over the box, a mouseover display will open, listing the channels individually.

For further explanation, refer to the page "Order Statistics".
2. EMBED CUSTOM LOGO
In the lower area of the menu "Admin > System settings > Interface", you have the option to upload your own logo.
![]()
This will replace the TB.One logo in the top left corner of the user interface.
![]()
3. CONFIGURING CUSTOM SETTINGS
The following settings can be configured individually for each user.
3.1 LANGUAGE SELECTION
The user interface of TB.One can be displayed in German or English. Select your preferred language from the drop-down menu in TB.One's header.
ATTENTION: |
The display language is completely independent from (multilingual) product data. You may create any number of languages in the menu "Articles > Translations > Languages". Only languages created there can be selected for exports to the channels. The configuration of languages can be done at any time, it is not something that is necessary at this stage of the setup. For detailed information, see the section about translations.
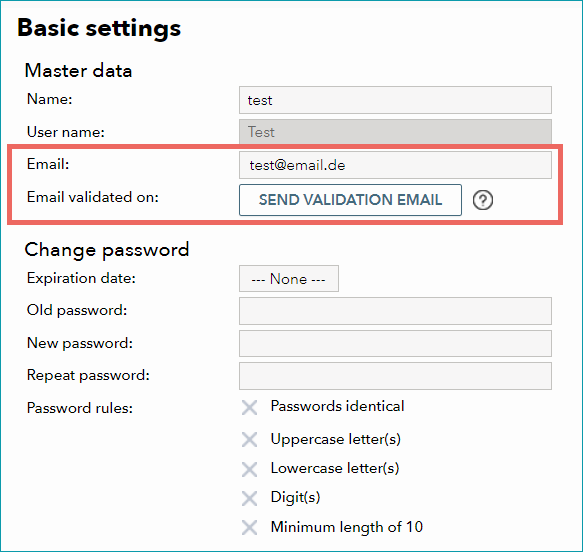
3.2 BASIC SETTINGS
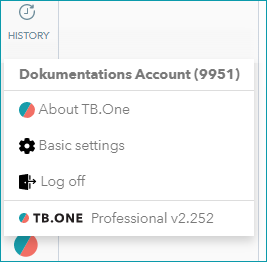
Open the settings for an individual user account by clicking on the TB.One icon the bottom left corner and choosing "Basic settings" from the pop-up.
Here you can change your user name, password, and email address as well as some personal display settings.
MASTER DATA
ATTENTION: |
TIP: For unconfirmed email addresses, the button “Send validation email” is available. Clicking the button also triggers a validation email. |
DISPLAY SETTINGS
In the section "Media detail view", you can choose to only display certain media types at your products. Additionally, you can hide all article media or only display article media for the first article. This setting is user-specific and merely affects the display of media on your user account. No product or article media will be lost.
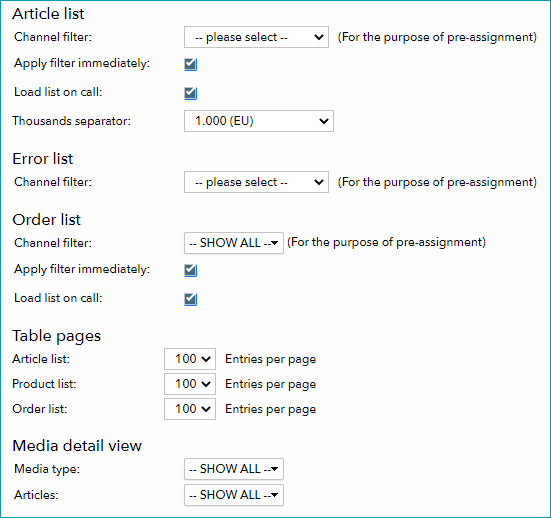
If applicable, choose which channel the order and/or article list should be filtered by when you first open it:
1. Select the channels you want to pre-filter from the dropdown menu.
2. Check the checkbox "Apply filter immediately" and save your settings.
TIP: |
TIP: |
In the section "Table pages", you may set the number of items displayed per page for different lists (increments of 50, max. 200 items per page).
3.3 HOME
In the "My Account" menu, select the tab "Pages" in the left navigation bar and click on the option "Home". A page tree will show the menu structure of your TB.One. Select the preferred starting page for your individual user account and click "Save". Starting with your next log-in, TB.One will start up by loading the newly defined starting page.
3.4 PRIVACY SETTINGS
Click on the TB.One icon at the bottom of the left navigation bar and select "Basic settings". This will open the menu "My account"/"Basic settings". Then, select the menu item "Privacy settings" in the left navigation bar.
ATTENTION: |
CHECKBOX FOR MATOMO OPT-IN/-OUT
See Tradebyte Privacy Policy, chap. 3.4: User data & analytics on our product sites
Tradebyte uses the services provided by Matomo as an independent application for the anonymised evaluation of user behaviour. There is no transfer of data to Matomo. The checkbox controls whether Matomo web analytics is active for all your Tradebyte SaaS solutions.
TIP: We recommend staying "opted in" (keep the checkbox ticked). This will facilitate further improvement of your user experience in compliance with data protection rules. |
4. CUSTOMIZING THE ARTICLE LIST
If you have not changed the starting page, TB.One will open the article list when you log in. In the default setting you will see all of the article list's available columns. You can, however, hide columns and/or change their order. To do this, click on the icon above the scroll bar on the right.
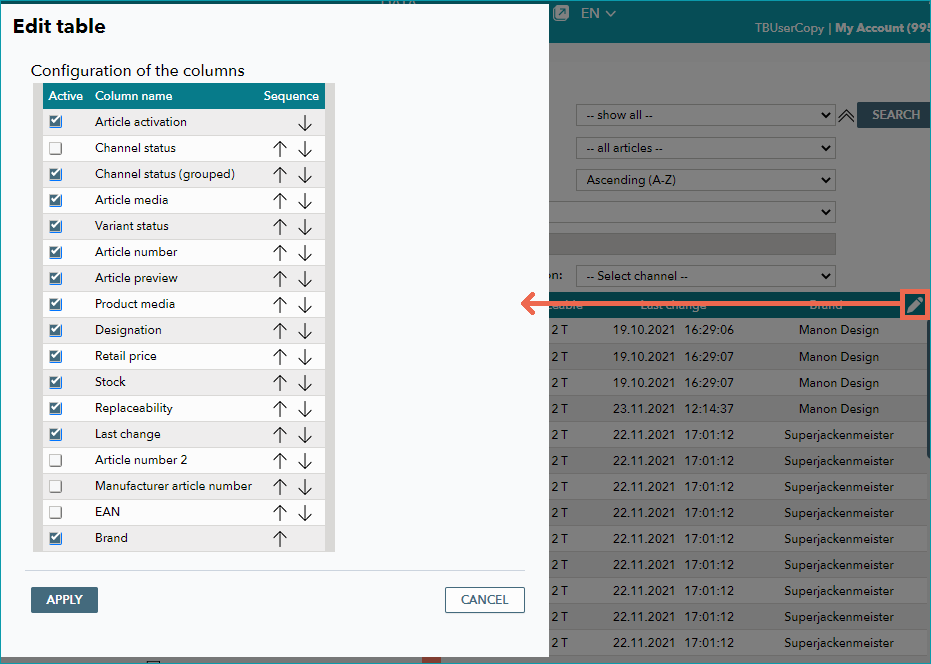
In the window that will pop up, you can hide individual columns by unchecking the box in front of the column's headline. With the arrows on the right, the order of the columns can be changed. Save your changes by clicking "Apply". These settings are user-specific.