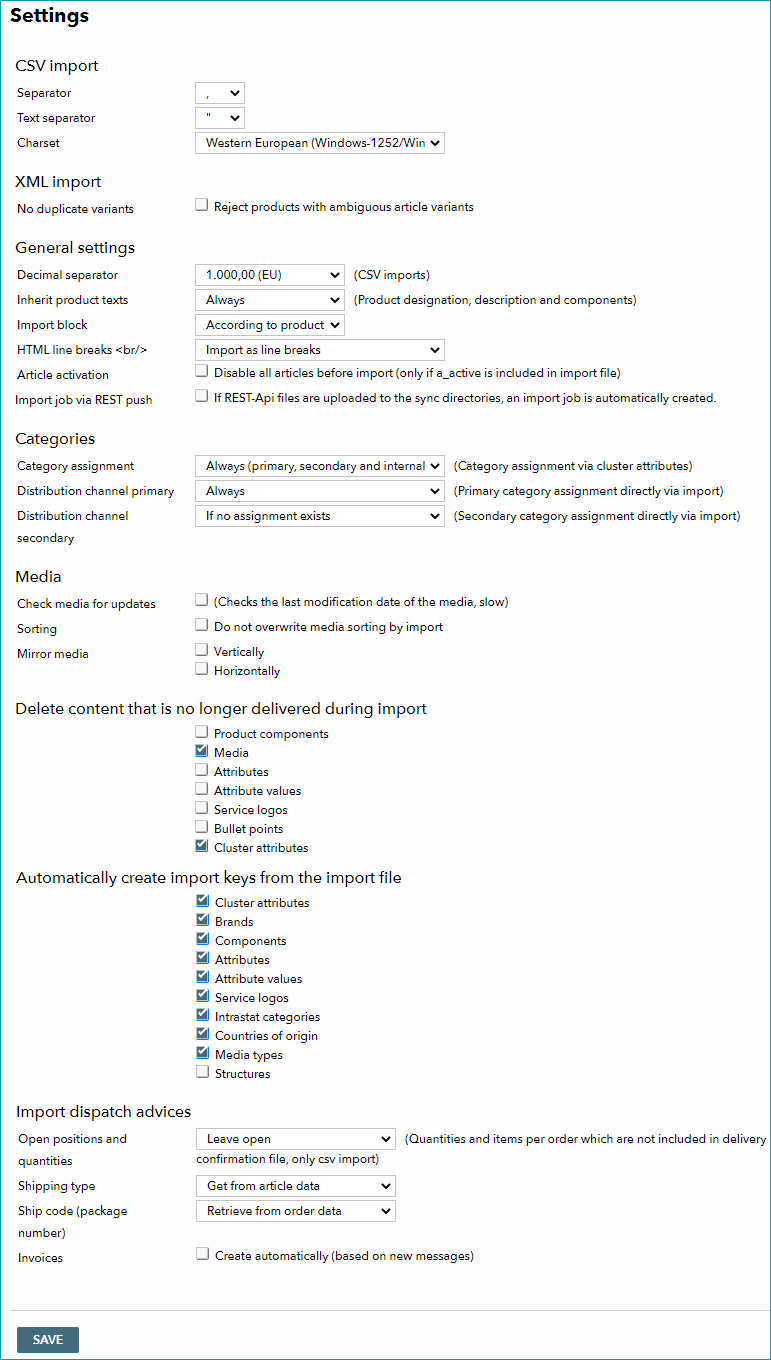
The import settings can be found at "Admin > Import > Settings". The individual sections of the menu will be discussed below.
In this section, you can specify basic settings for your import CSV files. More information on the overall structure of the CSV files can be found here.
CSV IMPORT |
|
|---|---|
Separator |
Column separator (e.g. "TAB" or ";") |
Text separator |
Delimits texts. You should always use a text separator in CSV files. |
Character set |
Character set used in the CSV file. Either "Western European (Windows-1252/WinLatin-1)" or "Unicode (UTF-8)". |
2. XML IMPORT
Determine whether or not non-unique variants (based on the article number) should be rejected during XML import. If they are not, the current set of data will be replaced by the new one.
SETTING |
DESCRIPTION |
|---|---|
Decimal separator |
This setting is only relevant for CSV imports. For imports via TB.Cat (XML) a period (.) is used as the decimal separator. |
Inherit product texts |
Determine when product name, description and components are to be imported.
|
Import block |
Here you can define, whether imports are blocked for product/variant data (e.g. components, attributes, product texts) and article media. All other information (such as activation, packing dimensions, prices and stock numbers) will still be adopted.
If needed, an enhanced import block can be activated. In this case, a checkbox titled "lock all" would be displayed next to the drop-down menu. Activating it overwrites the current settings and will cause all changes regarding products and articles (including media, stock and prices) to be ignored. It will no longer be possible to delete or create articles via import, or to move articles to other products. |
HTML line breaks |
Defines how HTML line breaks are handled in the import
|
Article activation |
If you provide the node <a_active> in the XML file or the column "a_active" in the CSV file, you can use this checkbox to disable the articles before import, so the article activations match your supplied file. If the option is enabled, all articles which are not contained in the import will be disabled automatically, if at least one value is provided for "a_active". If the checkbox is disabled or no "a_active" information is provided, articles which are not listed in the file will not be affected. |
Import job via REST push |
Here, your integration consultant can set whether files that are uploaded via REST should be processed immediately. |
4. CATEGORIES
If you provide category information with the product catalog, you can specify here how the assignments are made (also see the pages "Configuring the Application of Clusters" / "Configuring the Application of Internal Categories").
4.1 CATEGORY ASSIGNMENT
The option "category assignment" allows you to assign different categories (internal, primary and secondary for each channel) by means of clusters.
SETTING |
DESCRIPTION |
|---|---|
Always (only primary and internal categories) |
Primary and internal categories are imported according to the cluster settings at "Basic data > Classification > Cluster". |
Always (primary, secondary and internal categories) |
Primary, secondary and internal categories are assigned during import according to cluster settings at "Basic data > Classification > Cluster". Not all channels permit the assignment of secondary categories. |
Only at creation (all category types) |
If the product is new, primary, secondary and internal categories are assigned during import according to cluster settings at "Basic data > Classification > Cluster". Preexisting products are not affected. |
If no assignment exists |
Cluster-based assignment only takes place if no mapping exists. This is generally only the case for newly created products/articles or if a new channel is activated. |
Never |
There is no cluster-based assignment of internal or channel categories. |
4.2 DISTRIBUTION CHANNEL PRIMARY
SETTING |
DESCRIPTION |
|---|---|
Always |
Primary categories for the channels are provided in the import file and are assigned during import. |
Only at creation |
Primary categories for the channels are provided in the import file and are assigned whenever the import creates a new product. Preexisting products are not affected. |
If no assignment exists |
The assignment only takes place if there is no mapping yet. This is generally only the case for newly created products/articles or if a new channel is activated. |
4.3 DISTRIBUTION CHANNEL SECONDARY
The options are analogous to those described in 4.2. Not all channels process secondary categories, and assigning them may cause additional charges at some channels (e.g. eBay).
5. MEDIA
If you don't add media manually via the user interface, you may upload your images to the input folder via SFTP (zip-compressed; name: MEDIA_*.zip). The link to the products and articles is established by specifying "sync/media/[file name]" in the respective import file ([file name] is a placeholder; indicate the name of the respective media file without the square brackets). If your images are already stored on a server, it is sufficient to transfer the URLs in your import file. In this case it is not necessary to upload the images. If you provide your images via a zip file, please upload them only once (do not include them in every upload)!
With the checkbox "Check media for updates", the media's timestamps are reviewed to search for updated files.
Please note: Media are updated within twelve hours after the product data import to conserve resources. The import of new images and deletion of old images, however, takes place during product data import. An error report informs you about occurring errors when you check your media files' timestamps for updates. Open the error report in the menu “Data exchange > Directories > Error files”. The report is labeled “media_refresh_[Your client ID]_[identification number].csv”.
The checkbox "Sorting" defines which system is in charge of media sorting. If the box is checked, the order of images on the product media tab will not be overwritten if you provide a different order in the import file. If the box is not activated, the import file will determine the order of images and is the leading system for sorting.
"Mirror media" allows you to automatically mirror media without having to create new images (sometimes mirroring media is necessary due to channel requirements).
6. DELETE NO LONGER DELIVERED CONTENT DURING IMPORT
Here you may specify whether components, media, attributes, attribute values, clusters, service logos and/or bullet points will be automatically deleted from a product if they are no longer provided in the import file (the node itself still has to be present in the import file).
If this setting is activated for a certain category of information (e.g. product components) and you would like to add new values to that category while retaining preexisting values, you need to provide both the preexisting and the additional values in the import file. If a set of product data contains fewer values than in the previous product catalog, the values which are no longer provided will be deleted.
If you exclude the entire data node (e.g. <P_COMPONENTDATA>) from the import XML, or do not provide any values in the respective column in the import CSV, any preexisting values will be unaffected (i.e. they will not be deleted or overwritten).
TIP: Products that are not included in the import will not be affected. To delete a piece of information (e.g. a component), provide the respective node with all values that should remain valid in your import XML. If you import via CSV, provide all columns in that group of information (e.g. all component columns) and delete the value (not the column) of the information you no longer want to include. If you remove all values for a certain group of information (e.g. all component values), TB.One will consider this a node that was not provided. Therefore, no changes will be made. To achieve the same effect with an XML, delete the node entirely. |
If this option is not enabled and you provide new values during imports, they will simply be added to the existing values.
7. AUTOMATICALLY CREATE IMPORT KEYS FROM THE IMPORT FILE
Import keys of clusters, brands, components, service logos, IntraStat numbers and countries of origin can be created automatically during import. Key-based data referencing is the preferred method of import for TB.One. Click here for further information on constructing the TB.Cat import.
8. IMPORT DISPATCH ADVICES
Defines how messages are imported and whether invoices should be automatically created based on new messages. A detailed description of these settings can be found here.